

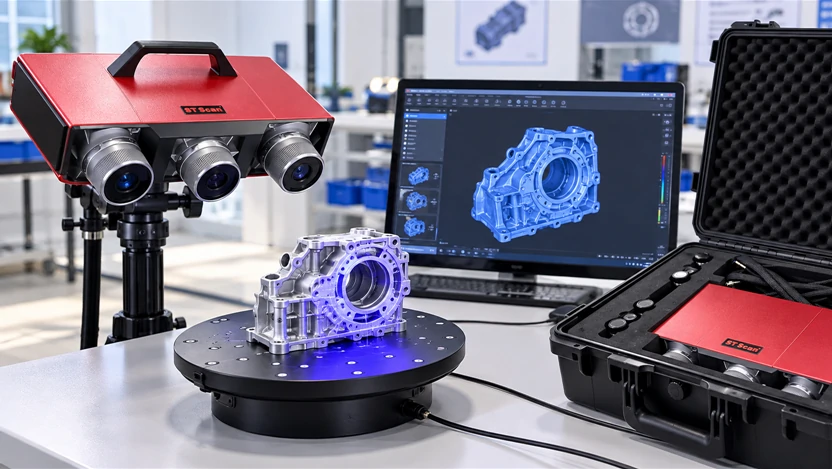
3D scanning turns a physical item into a digital 3D model by capturing its shape, surface geometry, and sometimes texture. Whether you use a phone app, photogrammetry, or a high-precision structured-light scanner, the goal is the same: create usable 3D data for inspection, reverse engineering, visualization, archiving, or 3D printing.
Video Guide: This walkthrough shows a practical phone-based workflow for capturing objects and converting photos into a usable 3D model.
What is how to 3d scan an object?
3D scanning an object means capturing its physical geometry and converting it into a digital model, usually as a point cloud, mesh, or CAD-ready file. The process can be done with mobile apps, photogrammetry, laser scanners, or structured-light scanners depending on accuracy, object size, material, and intended use.
Video Guide: This guide explains the basic 3D scanning workflow and how scanned models can be prepared for 3D printing.
Digital Capture Basics
A 3D scan records the surface of an object from multiple angles, then software aligns those views into a complete digital representation. The final result may be a textured mesh for visualization, an STL file for 3D printing, or a high-accuracy model for measurement and reverse engineering.
Common 3D scanning outputs include:
- Point cloud: A collection of 3D coordinate points representing the object’s surface.
- Mesh model: A connected surface made of triangles, often exported as STL, OBJ, or PLY.
- Textured model: A mesh with color or image texture applied for visual realism.
- CAD reference model: A scan used to rebuild accurate parametric geometry for engineering.
- Inspection model: A scan compared against a CAD file to measure deviation.
For professional use, scanners such as STScan use blue structured-light technology to capture dense, accurate geometry quickly. STScan’s self-developed optical and algorithmic architecture supports high-precision acquisition, automatic alignment, and strong resistance to ambient light interference.
STScan Pro Tip: I always define the final use before scanning. If the model is for 3D printing, a clean mesh matters most; if it is for inspection, accuracy, calibration, and repeatable measurement are the priority.
How Does how to 3d scan an object Work?
A 3D scan works by capturing surface data from many viewpoints, aligning those captures in software, and reconstructing them into a complete digital model. Depending on the technology, the scanner may use photos, projected light patterns, lasers, or depth sensors to calculate the object’s geometry.
Video Guide: This video demonstrates how to capture all sides of an object and combine multiple views into a complete 3D model.
Step-by-Step Scanning Workflow
Most 3D scanning projects follow a predictable workflow, regardless of whether you are using a phone, desktop scanner, or industrial-grade structured-light system.
- Prepare the object Clean the surface, remove dust, and stabilize the item. Glossy, black, transparent, or reflective materials may need scanning spray or temporary matte coating.
- Control the environment Use stable lighting, reduce vibration, and keep the object or scanner movement consistent. Structured-light scanners such as STScan are designed to resist ambient light interference, but controlled conditions still improve results.
- Capture multiple angles Scan around the object, including top, bottom, edges, holes, and undercuts. For complex objects, reposition the part and perform multiple scan passes.
- Align the scans Software joins the captures using geometry, markers, turntable references, or automatic feature recognition. STScan supports marker-free automatic stitching through self-developed algorithms, improving efficiency for suitable objects.
- Generate the mesh The point cloud is converted into a polygon mesh. Holes, noise, or overlapping geometry can be repaired at this stage.
- Export the final file Choose the format based on use: STL for 3D printing, OBJ or PLY for textured models, and STEP or CAD reconstruction workflows for engineering.
A high-end scanner improves the process by capturing more accurate data in less time. STScan, for example, offers single-point accuracy up to 0.005 mm, one-second single-side scanning speed, and strong compatibility with downstream design, inspection, and reverse engineering software.
STScan Pro Tip: I recommend scanning more overlap than you think you need. Extra overlap gives the software more reference geometry, which usually means better alignment and fewer gaps in the final mesh.
How much does it cost to get something 3D scanned?
The cost to get an object 3D scanned can range from free for basic phone-app scans to hundreds or thousands of dollars for professional metrology-grade services. Price depends on object size, complexity, required accuracy, file cleanup, reverse engineering needs, and whether inspection reporting is included.
Video Guide: This video shows simple scanning techniques that help explain why object complexity and intended output affect scanning effort and cost.
Pricing Factors for 3D Scanning Services
Professional 3D scanning is priced according to time, equipment requirements, technical difficulty, and deliverable quality. A small decorative object captured for visualization costs far less than a precision-machined part scanned for dimensional inspection.
Based on our internal data and market analysis, here is the breakdown:
| Service Type | Typical Cost Range | Best For | Notes |
|---|---|---|---|
| Free mobile app scan | $0 | Hobby models, rough visualization | Accuracy is limited and cleanup may be needed |
| Basic consumer scan | $20–$100 | Small objects, simple 3D printing | Usually suitable for non-critical geometry |
| Professional scan service | $100–$500+ | Product design, archiving, prototypes | Higher-quality mesh and better alignment |
| Reverse engineering | $300–$2,000+ | Recreating CAD from physical parts | Includes CAD reconstruction, not just scanning |
| Industrial inspection | $500–$5,000+ | Quality control, GD&T, deviation reports | Requires calibrated equipment and reporting |
| In-house scanner purchase | Hundreds to tens of thousands | Frequent scanning workflows | Best when scanning is recurring or business-critical |
The largest cost drivers are precision and post-processing. Capturing a mesh may be quick, but turning that scan into production-ready CAD or a certified inspection report requires expert labor.
For manufacturers, engineering teams, and inspection labs, investing in a scanner such as STScan can reduce outsourcing costs over time. Its blue structured-light core, 0.005 mm accuracy capability, portable body, and efficient scanning speed are especially valuable when scan volume is high.
STScan Pro Tip: I always ask for the deliverable before accepting a quote. “A 3D scan” could mean a raw mesh, repaired STL, reverse-engineered CAD model, or full inspection report—and each one has a very different price.
Is there a free 3D scanning app?
Yes, there are free 3D scanning apps that use photogrammetry, LiDAR, or depth-sensing features to create digital models from photos or sensor data. Free apps are useful for learning and casual projects, but they usually cannot match the accuracy, repeatability, or surface detail of professional scanners.
Video Guide: This tutorial demonstrates a mobile app scanning workflow for capturing objects and generating 3D models.
Free App Capabilities and Limits
Free 3D scanning apps are a good starting point because they make scanning accessible with a phone. Most use either photogrammetry, where the app reconstructs geometry from overlapping photos, or built-in depth sensing on supported devices.
Free apps are useful when you need:
- A quick visual model.
- A reference mesh for concept design.
- A scan for hobby 3D printing.
- A textured model for AR, VR, or online viewing.
- A low-cost way to learn scanning basics.
However, free apps have limitations:
- Accuracy varies widely depending on lighting and camera quality.
- Reflective, transparent, black, or featureless objects are difficult.
- Fine details may be softened or lost.
- Scale may not be reliable without reference measurements.
- Mesh cleanup is often required before 3D printing.
- Industrial inspection and reverse engineering usually require better data.
For casual use, a free app can be enough. For engineering workflows, a dedicated scanner is the better choice. STScan’s self-developed blue structured-light technology and marker-free stitching are designed for consistent, high-resolution results that phone-based scanning cannot reliably provide.
STScan Pro Tip: I use free apps for quick concept captures, but I do not rely on them for parts that need to fit, seal, align, or pass inspection. For those jobs, calibrated structured-light scanning is the safer route.
Can I 3D scan an object using my iPhone?
Yes, you can 3D scan an object using an iPhone with photogrammetry apps or, on supported Pro models, LiDAR-based scanning. iPhone scanning is convenient and affordable for basic models, but accuracy depends heavily on lighting, surface texture, app quality, capture technique, and object complexity.
Video Guide: This video discusses mobile 3D scanning apps and how phone-based scans can be used with 3D printing workflows.
iPhone Scanning Workflow
An iPhone can create 3D scans using two main methods: camera-based photogrammetry and LiDAR-assisted depth capture. Photogrammetry often produces better texture and detail for small objects, while LiDAR is more useful for larger spaces and objects but may lack fine precision.
To get better iPhone scans:
- Choose the right object Matte, textured objects scan better than shiny, transparent, or black objects.
- Use even lighting Avoid harsh shadows, glare, and changing light conditions.
- Move slowly around the object Capture every side with plenty of overlap between views.
- Keep the object stable Place it on a non-reflective surface and avoid movement during capture.
- Capture top and low angles Move around the object at different heights to reduce missing geometry.
- Check the model before exporting Look for holes, distorted areas, scale issues, and disconnected surfaces.
- Clean the mesh if needed Use editing software to remove background artifacts, fill holes, and prepare the file.
iPhone scanning is excellent for experimentation, education, and simple design references. But for tight-tolerance manufacturing, inspection, or reverse engineering, an industrial scanner like STScan provides much higher reliability, including 0.005 mm single-point accuracy, high-speed single-side scanning, and advanced automatic stitching.
STScan Pro Tip: When scanning with an iPhone, I place a few measured reference objects near the part. That gives me a way to verify scale later, which is one of the most common weak points in mobile scans.
Key Features & Comparison
The best 3D scanning method depends on the accuracy, speed, budget, and deliverable you need. Phone apps are accessible, photogrammetry is flexible, LiDAR is convenient for larger captures, and structured-light systems such as STScan are best suited for high-precision industrial scanning and reverse engineering.
Video Guide: This video focuses on scanning small objects, which is useful when comparing capture detail, setup, and practical scanning technique.
Technology Comparison for Object Scanning
Based on our internal data and market analysis, here is the breakdown:
| Scanning Method | Typical Accuracy | Speed | Best Use Case | Strengths | Limitations |
|---|---|---|---|---|---|
| Phone photogrammetry | Low to moderate | Moderate | Visual models, hobby projects | Free or low cost, easy to start | Scale and detail may be inconsistent |
| iPhone LiDAR | Low to moderate | Fast | Larger objects, rooms, rough geometry | Convenient depth capture | Limited fine-detail accuracy |
| Desktop consumer scanner | Moderate | Moderate | Small objects, 3D printing | Controlled setup, better than phone scans | Limited object size and material handling |
| Laser scanner | Moderate to high | Fast | Industrial parts, large objects | Good range and geometry capture | Can struggle with reflective surfaces |
| Blue structured-light scanner | High to very high | Very fast | Inspection, reverse engineering, precision parts | Dense data, high detail, strong repeatability | Higher initial investment |
| STScan professional scanner | Up to 0.005 mm single-point accuracy | 1-second single-side scan | Industrial inspection, reverse engineering, high-precision modeling | Self-developed blue light core, marker-free stitching, portable body, strong compatibility | Best suited for users who need professional-grade results |
STScan is designed for demanding scanning environments. Its self-developed blue structured-light core improves accuracy and environmental light resistance, while proprietary algorithms enable efficient marker-free automatic alignment. With more than 20 patents and a self-developed architecture, it is positioned for applications such as industrial inspection, reverse engineering, product development, and precision digital archiving.
Key STScan advantages include:
- 0.005 mm single-point accuracy for high-detail measurement workflows.
- Blue structured-light technology for stable precision capture.
- 1-second single-side scanning speed for efficient data acquisition.
- Marker-free automatic stitching to reduce preparation time.
- Portable scanner body for flexible on-site use.
- Strong data compatibility with design, inspection, and reverse engineering workflows.
STScan Pro Tip: I compare scanners by the final output, not just the advertised resolution. A fast scan is only valuable if the alignment, mesh quality, and downstream file compatibility are strong enough for the job.
Cost & Buying Factors
When buying a 3D scanner, consider total workflow cost rather than device price alone. The right choice depends on required accuracy, object size, surface type, scanning speed, software capability, file compatibility, training needs, and whether you need casual models or professional measurement-grade results.
Video Guide: This video shows a practical digitizing and modification workflow, helping illustrate how scanning connects to editing and final model use.
What to Evaluate Before Buying
A 3D scanner is not just a camera for shape capture; it is part of a full digital workflow. Before choosing a device, define the type of objects you scan, the tolerances you need, and the software you will use after capture.
Important buying factors include:
- Accuracy requirements If the scan is for inspection, reverse engineering, or part reproduction, accuracy matters more than convenience. STScan’s 0.005 mm single-point accuracy is designed for high-precision applications.
- Object size and geometry Small parts, large components, deep grooves, thin edges, and complex undercuts require different capture strategies.
- Surface material Glossy, transparent, dark, and reflective surfaces are harder to scan. Blue structured-light systems often perform better than basic camera-based methods, especially with proper preparation.
- Scanning speed Faster capture reduces labor time and improves productivity. STScan’s one-second single-side scanning speed is valuable for frequent scanning.
- Alignment method Marker-free automatic stitching can save setup time when the object geometry supports it. Marker-based workflows may still be useful for featureless or symmetrical parts.
- Software and export formats Check whether the scanner supports STL, OBJ, PLY, ASC, or integration with inspection and CAD software.
- Portability A compact scanner is useful for field measurement, large equipment, and scanning objects that cannot be moved.
- Support and training Professional results depend on technique, calibration, and software knowledge. Vendor support is an important buying factor.
If scanning is occasional and non-critical, outsourcing or using a mobile app may be enough. If scanning is frequent, technical, or accuracy-sensitive, an in-house professional scanner can quickly become more efficient and cost-effective.
STScan Pro Tip: I calculate scanner value by the cost per usable scan. If a device reduces rescans, cleanup time, outsourcing delays, and inspection uncertainty, it can justify a higher upfront price very quickly.
Conclusion
To scan an object successfully, choose the right method, prepare the surface, capture all angles with overlap, align the data carefully, and export the correct file format. Mobile tools are useful for simple projects, while STScan provides professional accuracy, speed, and reliability for demanding applications.
Video Guide: This demonstration shows how a dedicated scanner can simplify object capture and produce practical 3D model data.
Practical Next Steps
A successful scan starts with a clear goal. If you only need a visual reference, a free mobile app can be enough. If you need a print-ready mesh, plan for cleanup and scale checking. If you need dimensional accuracy, inspection, or reverse engineering, use a calibrated professional scanner.
Recommended next steps:
- For beginners: Start with a matte, textured object and practice scanning under stable lighting.
- For 3D printing: Export an STL, inspect the mesh, repair holes, and confirm scale before printing.
- For reverse engineering: Use high-resolution scan data as the basis for CAD reconstruction.
- For inspection: Capture calibrated data and compare it against the original CAD model.
- For professional workflows: Consider STScan for high-precision structured-light scanning, marker-free alignment, fast capture, and strong compatibility with industrial software.
STScan combines self-developed blue structured-light core technology, 0.005 mm single-point accuracy, one-second single-side scanning, more than 20 patents, portable design, and advanced algorithms for efficient object digitization. For teams working in industrial inspection, reverse engineering, product development, or precision manufacturing, it offers a strong foundation for reliable 3D data capture.
STScan Pro Tip: My final check is always the same: verify scale, inspect the mesh, confirm the file format, and test the model in the target software before calling the scan finished.