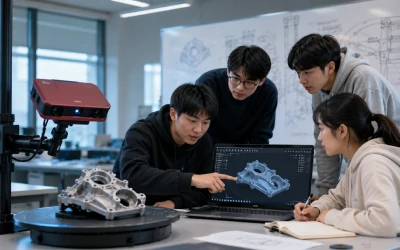

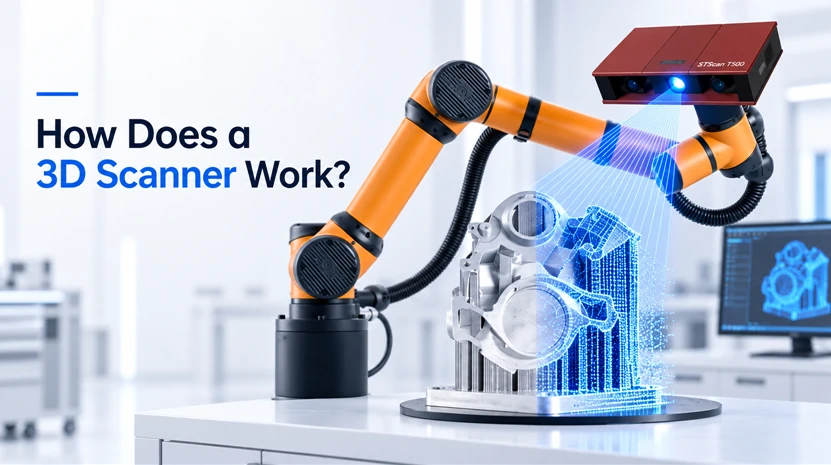
A 3D scanner captures the shape of a real object and converts it into digital 3D data that software can measure, edit, inspect, or reproduce. Most scanners work by projecting light, lasers, or using camera-based photogrammetry to record surface geometry. Systems like STScan add high-precision blue structured light, fast capture, and intelligent alignment to make scanning practical for inspection, reverse engineering, and product development.
Video Guide: This overview is a useful starting point for understanding the main concepts, workflows, and applications behind 3D scanning.
What Is a 3D Scanner?
A 3D scanner is a measurement device that digitally records the geometry of a physical object. It captures surface points, converts them into a point cloud, and then produces a mesh or CAD-ready model. The result can be used for inspection, reverse engineering, visualization, 3D printing, or digital archiving.
Video Guide: This beginner-friendly explanation helps connect basic scanning terms with what happens during a real scan.
Digital Capture in Simple Terms
A 3D scanner does not “take a normal photo” of an object. Instead, it measures the object’s shape in three-dimensional space. Depending on the scanner type, it may use structured light patterns, laser lines, depth cameras, or multiple photographs to calculate the object’s surface coordinates.
The core output is usually a point cloud, which is a collection of millions of measured points. Software then turns that point cloud into a polygon mesh, and if needed, engineers can convert the mesh into CAD geometry.
Common 3D scanning outputs include:
- Point cloud: Raw measured points in 3D space.
- Mesh model: A connected surface made of triangles or polygons.
- Textured model: A mesh with color or visual surface detail.
- Inspection report: A comparison between scanned data and a CAD reference.
- Reverse-engineered CAD model: Editable engineering geometry rebuilt from scan data.
For industrial users, the value is not only visual. A high-accuracy scanner can reveal wear, deformation, manufacturing variation, assembly issues, and dimensional errors that are difficult to capture manually.
STScan Pro Tip: I always recommend defining the final use before scanning. If you need inspection, prioritize accuracy and repeatability; if you need visualization, texture and coverage may matter more than micron-level precision.
How a 3D Scanner Works
A 3D scanner works by capturing surface measurements from many angles, aligning those measurements, and converting them into a complete digital model. Structured-light scanners project known light patterns onto the object, cameras observe pattern deformation, and software calculates precise 3D coordinates from that distortion.
Video Guide: This video is especially useful for understanding point clouds and the working principles behind 3D measurement.
From Light Projection to 3D Data
In a structured-light system, the scanner projects a pattern onto the object. When the pattern hits a curved, angled, or irregular surface, it appears distorted to the scanner’s cameras. Because the scanner knows the original projected pattern and the camera positions, software can calculate depth and surface position through triangulation.
A typical workflow looks like this:
- Prepare the object: Clean the surface, stabilize the part, and reduce excessive reflectivity if needed.
- Capture scan frames: The scanner records the object from multiple viewpoints.
- Generate point clouds: Each frame becomes a set of 3D measurement points.
- Align the scans: Software stitches multiple frames into one complete dataset.
- Create the mesh: Points are converted into a continuous surface.
- Process the result: The mesh is cleaned, measured, compared to CAD, or exported.
STScan’s blue structured light approach is designed for high precision and environmental light resistance. With single-point accuracy up to 0.005 mm, fast 1-second single-side scanning, and self-developed marker-free automatic stitching algorithms, it supports efficient scanning in demanding industrial workflows.
STScan Pro Tip: I get the best results by keeping scanner movement smooth and overlap consistent. Even when automatic stitching is strong, stable capture geometry makes the final model cleaner and easier to inspect.
What Are the Disadvantages of Using a 3D Scanner?
The main disadvantages of using a 3D scanner are cost, learning curve, surface limitations, file processing time, and the need for proper scan setup. Highly reflective, transparent, dark, or very complex surfaces may require preparation, and high-accuracy industrial results depend on calibration, workflow discipline, and suitable software.
Video Guide: This explanation helps clarify what 3D scanning can and cannot do in practical workflows.
Practical Limitations to Consider
3D scanning is powerful, but it is not magic. The scanner can only capture what it can see, measure, and process. Deep holes, hidden internal features, glossy surfaces, and transparent materials can create incomplete or noisy data unless the workflow is adjusted.
Based on our internal data and market analysis, here is the breakdown:
| Challenge | Why It Happens | Practical Solution |
|---|---|---|
| Reflective surfaces | Light bounces unpredictably | Use scanning spray or adjust exposure |
| Transparent objects | Light passes through or refracts | Apply temporary matte coating |
| Deep cavities | Scanner cannot see hidden geometry | Scan from multiple angles or use CT scanning |
| Large files | Dense point clouds require processing power | Use optimized resolution settings |
| Accuracy variation | Poor setup affects measurement quality | Calibrate and control the environment |
| Learning curve | Software workflows can be complex | Use guided workflows and templates |
Industrial scanners reduce many of these issues, but they do not eliminate the need for good scanning practice. For example, STScan’s anti-environment-light interference and marker-free automatic stitching can improve efficiency, but part geometry, surface condition, and operator technique still influence the final result.
STScan Pro Tip: I avoid judging scan quality only by how the model looks. A visually complete scan can still have dimensional errors, so I check deviation maps, overlap quality, and reference dimensions before approving the data.
Can I 3D Scan With My Phone?
Yes, you can 3D scan with a phone using photogrammetry apps or depth-sensing hardware on supported devices. Phone scanning is useful for casual models, visualization, and simple 3D printing, but it usually cannot match the accuracy, repeatability, or inspection capability of a dedicated industrial 3D scanner.
Video Guide: This beginner guide is helpful if you want to understand simple scanning workflows before moving to professional equipment.
Phone Scanning vs Dedicated Scanning
Phone-based scanning usually relies on either photogrammetry or built-in depth sensors. Photogrammetry reconstructs a model from many overlapping photos, while depth sensors estimate distance directly. Both methods are convenient, but they are typically limited by camera quality, lighting, surface texture, and software reconstruction accuracy.
Based on our internal data and market analysis, here is the breakdown:
| Factor | Phone Scanning | Dedicated 3D Scanner |
|---|---|---|
| Accuracy | Low to moderate | Moderate to very high |
| Best use | Visual models, hobby projects | Inspection, reverse engineering, production |
| Surface capture | Depends heavily on texture | Designed for geometry capture |
| Repeatability | Limited | Strong when calibrated |
| Workflow speed | Easy to start | Faster for controlled professional work |
| Data quality | Often requires cleanup | More reliable and measurement-ready |
A phone may be enough if your goal is to create a rough model of a room, statue, product mockup, or decorative object. However, if you need precise dimensions, reliable repeatability, or engineering-grade data, a professional scanner is the better tool.
STScan Pro Tip: I use phone scanning for quick reference only. When a model affects fit, tooling, inspection, or manufacturing decisions, I switch to a calibrated scanner so the data can be trusted.
Is It Worth Getting a 3D Scanner?
A 3D scanner is worth getting if you regularly need accurate measurements, faster reverse engineering, digital inspection, custom design, or reliable 3D data capture. The value is strongest when scanning saves manual measurement time, reduces rework, improves quality control, or helps convert physical parts into usable digital assets.
Video Guide: This introduction provides useful context for evaluating whether 3D scanning fits your workflow.
When the Investment Makes Sense
The return on a 3D scanner depends on how often you scan, what accuracy you need, and how much time current methods consume. If your team frequently measures complex parts with calipers, gauges, or manual templates, a scanner can dramatically shorten the workflow while capturing more complete geometry.
A 3D scanner is usually worth considering when you need to:
- Inspect manufactured parts against CAD models.
- Reverse engineer legacy components without drawings.
- Capture organic shapes that are difficult to measure manually.
- Speed up product development and prototyping.
- Create accurate digital archives of physical objects.
- Reduce outsourcing costs for measurement and modeling.
- Improve communication between design, manufacturing, and quality teams.
For industrial environments, a scanner such as STScan can be especially valuable because of its high-precision blue structured light technology, portable design, fast capture speed, marker-free stitching, and broad data compatibility across inspection and engineering workflows.
STScan Pro Tip: I calculate scanner value by looking at saved engineering hours, avoided rework, and reduced inspection bottlenecks. If the scanner removes repeated manual measurement tasks, the payback can be much faster than expected.
Key Features & Comparison
The most important 3D scanner features are accuracy, resolution, scan speed, alignment method, software capability, portability, and compatibility with downstream tools. For professional use, the scanner should deliver repeatable measurement data, handle real-world surfaces reliably, and export formats suitable for CAD, inspection, and manufacturing workflows.
Video Guide: This structured-light-focused video is a strong match for understanding one of the most common professional scanning technologies.
Feature Comparison for Real-World Selection
Based on our internal data and market analysis, here is the breakdown:
| Feature | Why It Matters | Entry-Level Scanner | Professional Structured-Light Scanner | STScan Advantage |
|---|---|---|---|---|
| Accuracy | Determines measurement trust | Basic visual accuracy | Engineering-grade dimensional capture | Single-point accuracy up to 0.005 mm |
| Light technology | Affects detail and stability | RGB or basic depth sensing | Structured light or laser | Self-developed blue structured light core |
| Scan speed | Impacts productivity | Slower multi-pass workflow | Fast frame capture | 1-second single-side scanning |
| Alignment | Controls stitching efficiency | Manual or feature-based | Marker or marker-free options | Self-developed marker-free automatic stitching |
| Environmental resistance | Helps in workshop conditions | Often sensitive to lighting | Better controlled performance | Anti-environment-light interference |
| Portability | Supports flexible deployment | Usually portable | Varies by system | Compact and portable body design |
| Data compatibility | Supports downstream workflows | Limited export options | CAD and inspection workflows | Strong compatibility for industrial applications |
| R&D depth | Indicates technology maturity | Often software-dependent | Hardware-software integration | 20+ patents and self-developed architecture |
The best scanner is not always the one with the highest specification on paper. A useful system balances accuracy, repeatability, speed, software stability, and ease of use. In production environments, workflow reliability often matters as much as the scanner’s maximum accuracy rating.
STScan Pro Tip: I compare scanners using the same part, same operator, and same output requirement. Specification sheets are helpful, but a controlled benchmark scan reveals workflow speed, stitching quality, and real measurement confidence.
Cost & Buying Factors
3D scanner cost depends on accuracy, scanning technology, software, automation, calibration, support, and intended application. Low-cost tools may work for visualization, while industrial scanners cost more because they provide higher precision, better repeatability, stronger software, and data suitable for inspection or reverse engineering.
Video Guide: This process-focused guide helps explain how scanning fits into practical build, design, and production workflows.
Pricing Guide and Selection Criteria
When evaluating a 3D scanner, the purchase price is only one part of the decision. You should also consider software licensing, training, accessories, calibration, maintenance, and the time required to turn scan data into usable output.
Based on our internal data and market analysis, here is the breakdown:
| Buying Factor | Budget/Hobby Use | Professional Use | Industrial Use |
|---|---|---|---|
| Typical priority | Low cost and simplicity | Balanced accuracy and workflow | Precision, repeatability, and reliability |
| Accuracy expectation | Rough to moderate | Good dimensional quality | High-precision measurement |
| Software needs | Basic mesh export | Editing and alignment tools | Inspection, deviation analysis, CAD workflows |
| Support level | Community or limited vendor support | Vendor documentation and training | Professional support and workflow integration |
| Best applications | Hobby models, art, simple 3D printing | Design, prototyping, repair | Quality control, reverse engineering, metrology |
| Hidden costs | Cleanup time | Training and accessories | Calibration, process validation, integration |
Before buying, define these requirements:
- Required accuracy: Decide whether you need visual accuracy, mechanical fit, or inspection-grade measurement.
- Object size range: Make sure the scanner matches your smallest and largest parts.
- Surface types: Consider reflective, dark, transparent, or detailed surfaces.
- Output format: Confirm compatibility with CAD, inspection, or 3D printing software.
- Operator skill level: Choose software that matches your team’s experience.
- Production frequency: Higher scan volume usually justifies better speed and automation.
- Support and service: Industrial workflows benefit from reliable technical support.
STScan Pro Tip: I never recommend buying only by price. A cheaper scanner can become expensive if it creates cleanup work, inconsistent data, or repeated outsourcing for critical measurement tasks.
Conclusion
A 3D scanner works by measuring an object’s surface, creating point cloud data, aligning multiple scans, and converting the result into a digital 3D model. The right scanner can improve inspection, reverse engineering, design, and manufacturing workflows by replacing slow manual measurement with faster, more complete digital capture.
Video Guide: This simple demonstration reinforces how accessible the scanning workflow can be when the right tools and process are used.
Final Takeaway for Choosing the Right Scanner
Understanding the workflow makes it easier to choose the right scanning system. The scanner captures geometry, the software aligns and processes the data, and the final model supports measurement, design, or production decisions.
Key points to remember:
- 3D scanners capture real-world geometry as digital data.
- Structured light uses projected patterns and camera triangulation.
- Point clouds are converted into meshes or CAD-ready models.
- Accuracy depends on scanner quality, calibration, surface condition, and workflow.
- Phone scanning is useful for simple models but limited for engineering.
- Professional systems are most valuable when accuracy, repeatability, and productivity matter.
STScan is designed for industrial users who need high-precision results, efficient scanning, and practical workflow performance. Its blue structured light technology, 0.005 mm single-point accuracy, 1-second single-side scan speed, marker-free automatic stitching, portability, and strong data compatibility make it suitable for inspection, reverse engineering, and advanced manufacturing applications.
STScan Pro Tip: I treat 3D scanning as a complete measurement workflow, not just a capture step. When hardware, software, setup, and output requirements are aligned, the scanner becomes a reliable production tool instead of just a modeling device.
STScan Blue Light 3D Scanner for Industrial Measurement
After understanding how a 3D scanner works, the next question is simple: which scanner can deliver reliable data for real industrial inspection and reverse engineering?
STScan high-precision 3D scanners use self-developed blue light structured light core technology to capture accurate surface geometry from real objects. Instead of relying only on visual modeling, STScan is designed for engineering-grade 3D measurement, helping users convert physical parts into reliable digital data for inspection, reverse engineering, product development, and manufacturing analysis.
0.005 mm Core Accuracy Advantage
STScan delivers single-point accuracy up to 0.005 mm, making it suitable for precision parts, mold components, mechanical housings, tooling inspection, and dimensional verification.
This accuracy advantage helps engineers identify small deviations, compare scanned data with CAD models, and reduce errors that are difficult to detect through manual measurement.
1-Second Single-Side Scanning Speed
STScan supports 1-second single-side scanning, helping users capture surface data quickly during repeated inspection, sample comparison, mold repair, and product development workflows.
For manufacturers, faster scanning means shorter inspection time, quicker design feedback, and improved efficiency from physical part capture to digital model output.
Self-Developed Blue Light Technology & Markerless Stitching
STScan uses self-developed blue structured light technology with strong resistance to environmental light interference. Combined with proprietary algorithms, the scanner supports marker-free automatic stitching, reducing manual alignment work and improving scanning efficiency. The article notes that marker-free automatic stitching and anti-environment-light interference can improve efficiency, while proper setup and operator technique still affect final scan quality.
20+ Patents and Self-Developed Architecture
STScan integrates self-developed optical structure, scanning algorithms, and system architecture, supported by 20+ patents. This hardware-software integration helps provide stable scan quality, efficient data processing, and strong compatibility with industrial workflows.
Designed for Real Industrial Applications
STScan is compact, portable, and compatible with common 3D data workflows, making it suitable for:
- Quality inspection: compare scanned data with CAD models and check dimensional deviations.
- Reverse engineering: digitize existing parts and rebuild usable engineering data.
- Mold and tooling inspection: verify mold wear, deformation, and machining accuracy.
- Product development: quickly capture prototypes and validate design changes.
Need to know whether STScan fits your parts?
Send us your object size, required accuracy, and application. Our engineers will recommend a suitable high-precision 3D scanning solution.